|
...Cast solid with Jesmonite AC100 - AND get rid of
air bubbles
This How-to will tell you how to cast an item solid using Jesmonite AC100. This
article assumes you already have a mould to make the item from, if not check
out the articles on 'moulding it and casting it solid' from the
main How-to index.
Jesmonite AC100 is supplied as a liquid and a powder which are mixed
together at a ratio of 1 part liquid to 2.5 parts powder. A Jesmonite
thixotrope additive is also available to make the mixed resin into a gel
which won't be as runny - this is useful for the first coat inside the mould
when we are making hollow items.
Jesmonite is non-toxic and non-flammable as it is water based. Although it
has no dangerous fumes like solvent based resins it should still be used in
a ventilated area as it has some odour. In this example the work has been
carried out indoors with a nearby window open.
This article shows two methods, one that is quick and easy, and another
way to do it properly eliminating bubbles and other imperfections from the
cast.
For this example we are using a latex mould which has also had layers of
cloth added to make help make it rigid and prevent it from shrinking as it
dries. The mould has no rigid support jacket as it is quite small and keeps
it's shape by itself, therefore we can fill it with resin without it
stretching.

Method One - quick and easy, but not as good as Method Two
Jesmonite AC100 is mixed up by hand. However, as we are going to pour it
into the mould and we want it to take the detail it has been mixed up a
little thinner - around 1 part liquid to 2 parts powder instead of 1:2.5 as
directed. The mixed resin is then poured into the mould to the brim:

As we mixed the Jesmonite thinner than directed it takes a little longer to
solidify and finally set. After around an hour the mould it pulled off, but
in the process some of the base snapped off and it appears that it has not
properly set as some is stuck to the mould. However, the rest of the item is
in fairly good shape:

Although the base can be cleaned up, on closer inspection we can see that
there are also some air bubbles on surfaces that were facing upwards when
the item was being cast. This is because air rises out of the resin which is
introduced during mixing, and can't easily escape:

So altogether not very satisfactory. However, with a little more effort we
can reduce reduce the effects of both issues without any specialist
equipment.
Method Two - doing it properly
This time, we have mixed up a smaller amount of Jesmonite AC100 and added
the thixotrope additive. This is added at around 2-6g per Kg of mixed resin
so you need hardly any. The thixotrope makes the resin less runny so it will
stick to vertical surfaces, so it is very useful for making hollow items as
per the Jesmonite laminating How-To.
For this example the thixotrope will help us eliminate the air bubbles while
also allowing us to mix the resin at a ratio of 1:2.5 as directed so the
piece will be much stronger.
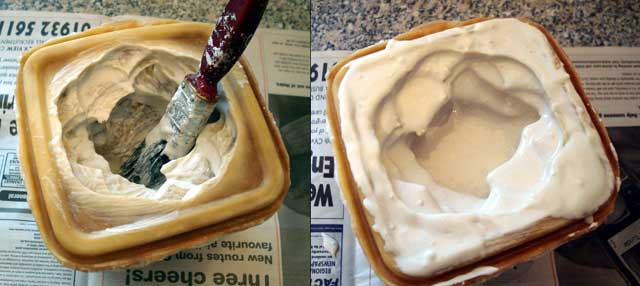
An initial coat of thickened Jesmonite AC100 resin is applied to the inside
surface of the mould. This is brushed on and therefore bubbles on the
surface are eliminated. Two coats of thickened resin are applied followed by
whatever was left in the pot:
The rest of the space is topped up with Jesmonite that is mixed directed at
a ratio of 1:2.5. After around 40 mins it has set, and although to be safe
it should be left for longer (1-2 hours) we carefully demoulded it. As you
can see, the entire base of the item is intact this time as the resin was
mixed as thick as it should have been to start with:
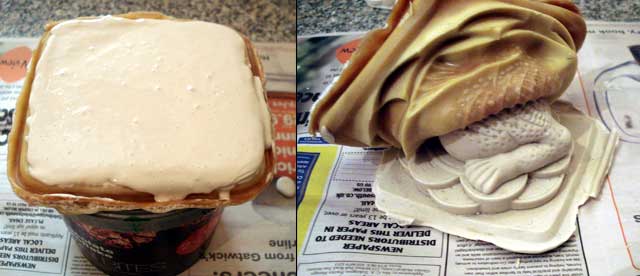
The item looks pretty good all over - mainly as resin was brushed into all
the details.

This time there are no air bubbles in the piece:

Jesmonite AC100 can painted with a wide range of paints from cellulose car
paints and lacquer to water based acrylics or even house hold gloss and
emulsion paints.
Check out the Jesmonite
AC100 Strength Testing page with
video of destruction testing. |
